


 Gift Cards
 Film Index
 FAQ
FAQA common question is “What’s a good film camera for beginners”
With the renewed popularity of film photography, a question we get regularly is what’s a good film camera to learn on. With rare exception, the answer to that question is the Pentax K1000 and it’s widely known as the film camera for beginners. The Pentax K1000 is Matt Day’s recommendation too and here is a video he created explaining why.
 Matt Day is a well-known photographer on YouTube and Instagram. He’s from Ohio and a friend of The Darkroom.
![]() Mattdayphoto
Mattdayphoto
Here’s a quick-start guide to shooting film with the Pentax K1000
The Pentax K1000 is a popular camera that was produced from 1976 to 1997 and it’s still easy to find. The K1000 is popular among photography students and new-coming amateur photographers because of its minimal features, making it simple to use and a good film camera for beginners. The all-manual operation and minimalist features include the ability to control shutter speed and aperture.
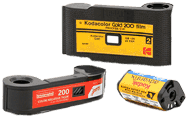
What Film to Use?
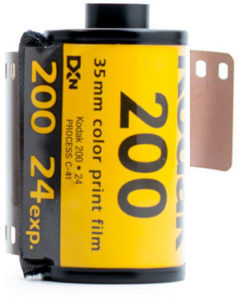 While there are many different film options, one of the best to start with is Kodak Gold 200. It’s commonly found and great for many daylight situations. The ISO for this film is 200 (ISO is the film speed), which will be used when loading and setting up the camera. Lower speed films (like 100 or 200) have a finer grain and typically have better quality, but can blur the subject if it’s in motion. Generally, higher film speed is used in lower light conditions and lower film speed is better for shooting in brighter light.
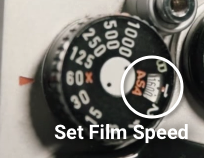
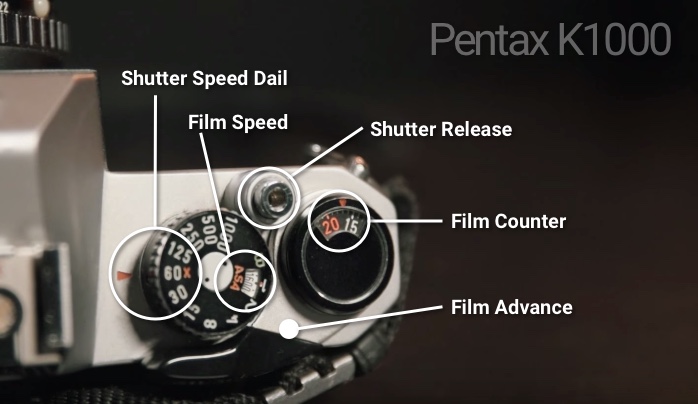
To set the film speed on the camera, lift the outer ring on the shutter speed dial and rotate the dial until the number matches the speed of your film.
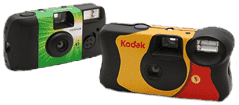
Amazing Photos with Cheap Cameras
Cheap cameras under $100 that take great photos, perfect for travel, adventure, hiking, rainy days or your daily shooter.
Loading Film
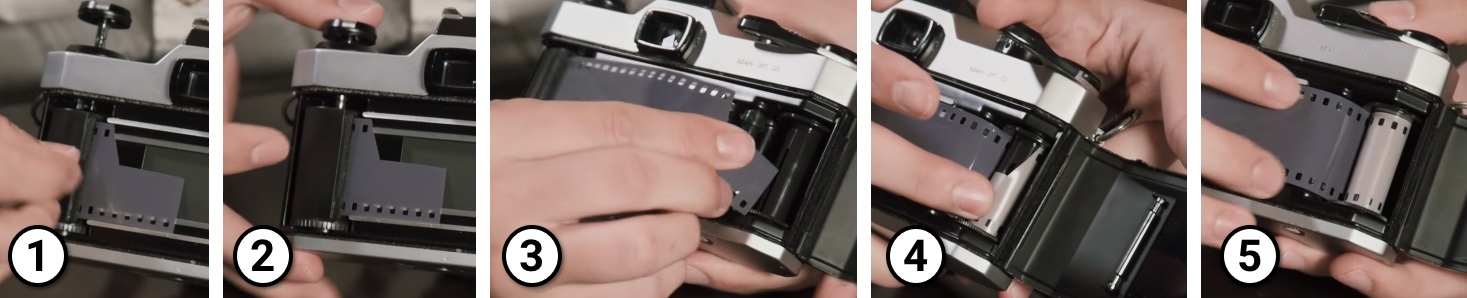
- Lift the film rewind level all the way and insert the film cartridge.
- Once film cartridge is in place, push down the film rewind lever
- Tuck the film leader in the slit in the take-up spool
- Advance film a couple of frames to ensure the film is completely engaging and wrapping around the spool
- It’s important to confirm the teeth are lined up with the sprocket holes.
…Close camera back and advance film a couple more times to confirm the film rewind level is turning too.

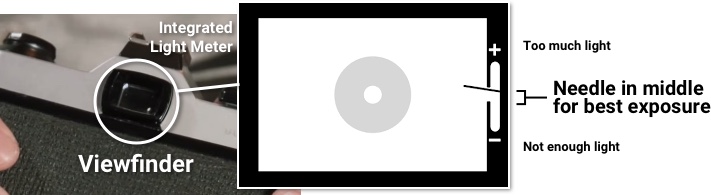
Adjusting for the Best Exposure
When looking in the viewfinder, the K1000 has an integrated light meter as a guide for the best lighting conditions and settings. As you point the camera and focus on the subject, the needle in the viewfinder will adjust to the lighting. When the needle is pointing higher the photo is too bright, and when the needle is pointing lower the photo is too dark. Adjust the shutter speed and f-stop until the needle is pointing horizontally across the viewfinder to the left.
Adjust Lens Aperture
To adjust the brightness, rotate the aperture ring to see if the brightness improves. A lower aperture size, or f-stop, allows more light through the lens, brightening the picture. A higher f-stop allows less light through the lens, darkening the picture.
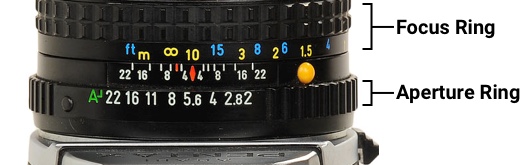
Adjusting Shutter Speed
If the needle does not move, then rotate the shutter speed dial and try to adjust the f-stop again. Higher shutter speeds allow less light through to the film, and lower shutter speed allows more light through to the film.
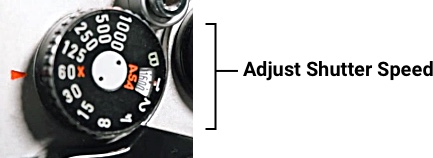
It’s recommended that you keep your shutter speed at 60 or higher.
Shutter speed less than 125 can be used with a flash and would mean a longer exposure time and more chance of blur if a flash is not used.
Matt Day answers one of the most common questions he gets about film photography, and that’s what film camera is good for beginners?
Video Transcript
[Matt Day] I get asked that question almost every single week by somebody that sends in an e-mail. And over the last couple of years, I’ve actually been asked by probably 5 or 6 friends of mine that they want to get started in photography and they’d like to shoot film, but they don’t know where to start. They don’t have any cameras and every single time I recommend the Pentax K1000. And I’m not the only person who recommends this camera; it’s sort of widely known as the perfect beginner camera. But because I get that question so often, I thought it would be a good opportunity for me to just sit down and talk about this camera and why I recommend it so much. So that way, any time people want to know, I can just direct them to this video because like I said, I answer this question probably at least once or twice a week.
Pretty much it’s recommended to be the perfect beginner camera for a lot of different reasons, and we’ll get into that. But back in the day, they started production of this camera in 1976. I believe it was sometime in the 70s and for a long time, it was pretty much widely known as the high school camera for photography classes or even college classes just because they’re really simple to use, they’re really reliable cameras, and they’re great. They’re just good solid workhorses for anybody who’s getting into it or even just people who have been shooting for years.
My friend Josh Richter, this is actually his camera and I recommended him to pick up the K1000 whenever he wanted to get into photography, and he’s been using it ever since then. And I mean he’s done amazing work with this thing. So I asked him to let me borrow the camera just so I could make a video on it because I actually started with my Minolta XG-M and I feel like if I started with this camera, I probably would’ve at least gotten the hang of exposure a lot quicker just because of the way the metering is set up and so on. But yeah, I figured we would take a look at this camera today. I’d kind of talk about the features and yeah, hopefully, some of you guys out there that are looking for a camera to start with, you’ll be able to pick up a K1000.
All right! So we’re going to take a closer look at the camera here and right off the bat just from taking a quick glance at the camera, you can see it’s a really minimalist kind of camera, not a whole lot going on, not many features at all really, but that’s what I love about the camera. I love how simplistic it is and really, really easy to use, very back to the basics. It’s nice when you go from shooting with something that has a lot of different features and then you go back to this where you’re really only controlling your shutter speed and aperture and that’s it. So really enjoyable camera to use.
But other than that, you get a shutter speed dial right up here which range from 11,000th of a second to one second or both if you want to do long exposures. And speaking of which, the shutter release right here is threaded; so that way, you can use a cable release for a long exposure which is really convenient. Inside your shutter speed dial, you can lift this up and then turn it and that’s going to adjust your film speed. So whatever your film speed is or if you’re pushing or pulling your film, you can adjust that and that’s going to control your light meter inside the viewfinder. Inside your film advance right here, you have your film counter.
So as you adjust the film or advance the film, the little frame counter right here will change and it just has the numbers inside the little window to let you know what frame you’re on. Up here you have your film rewind. But before you do that, you’ll press this button here on the bottom and that will basically just unlock your film whenever it’s being wound up on this lever here. So that way, whenever you go to rewind your film, you’re not going to rip it out. There we go. So after you press that button you just wind it up just like any other 35 millimeter SLR really and then lift up and it pops up in the back and that’s where you load your film or take your film out whenever you’re done. I’ll load a roll of film here in a minute. But just so you know, that’s how that goes.
SLR v Rangefinder – The two most common types of cameras are SLR and Rangefinder, both carry their own pros and cons. Learn more about the differences.
And on the bottom, you have your tripod mouth as well as your battery compartment. Now one thing to keep in mind about the battery is this camera is completely mechanical. So if your battery dies, you’re not going to be without a camera that’s functioning; you’re just not going to have a light meter in your viewfinder which really isn’t a big deal. If you’re used to shooting with a certain film or a certain speed, you’re going to know your exposures. After a while, this stuff just kind of sticks in your mind and even if you don’t really know exactly, you can always kind of work with something like the sunny 16 rule and just go from there. So that’s a plus in my opinion. If you don’t have a battery or if your battery dies, you can still shoot with this camera. And the batteries in this thing, it’s just one little small cell battery that… Those things seem to last forever. I had one in my Minolta XG-M for probably a few years before I ever had to change the batteries. So nice thing about it is those things do last a long time even if they are kind of harder to find.
As far as your lens right here you have your lens mount and you just lift, basically pull back on this little lever right here on the side to take your lens on and off. And you’ve got your mirror that you can see in there since this is an SLR. And yeah, really, really simple. And now your lens back clicks into place, and there you go. Up here on the top, you do have a hot shoe, but also on the side, you have this little X sync port so that way if you want to just run a PC sync or something to the camera without actually flash on top, you can do that as well. So yeah, a really simple camera, not a whole lot to talk about. I mean that pretty much covers the entire details of the entire camera. So yeah, really simple stuff. But we’ll go ahead and load up a real film. That way you guys can see exactly how it works.
All right! So I have a roll of HP5 in here that I bulk loaded myself and that’s what I’m going to be shooting in here. And I’m going to be pushing it to 1600. [More on pushing film] So before I do anything, I’m going to lift up on the shutter speed dial so that way I can turn this to 1600. Right there. So that way, I know that whenever I’m metering in there, it’s going to be metering properly. Now I’m going to try and load this film backward so that way you guys can kind of get a better view. So just work with me here, this might be kind of difficult. Before I do this though, I am going to fire the shutter a couple of times just so you guys can hear it. I love the sound of this camera. It has a nice mechanical sound to it obviously. But each camera has a different sounding shutter. If you guys watch my videos, you’ll know I love the sound of different shutters.
So we’ll load this right here. You’ll want to lift this tab up a little bit because you can see it releases those prongs and that’s what’s going to hold this in the place. So lock that down. And then you’ll take this over and you’ll basically just want to tuck this little film leader into this little slit in this pool and hopefully, it’ll kind of hold this down a little bit. So that’s still engaged. There we go. So that’s good to go. It’s wrapped around in there and you can see that these little teeth right here are lining up with the sprocket holes and that’s really important to make sure you do that. And then from there you can go ahead and close it and release your shutter.
And then you’ll want to give it just a couple of advances because all that film that was pulled across the back there, that’s what’s behind the shutter, but that’s already been exposed to this light already. So if you want to take a close look at the film counter right there, you can see it’s still basically 2 places right behind 0. So I will advance it and release it and then I’ll advance again. And you can see as I’m doing this, the little knob over here is spinning and that’s just going to let me know that the film is advancing because it is moving this ball. It will start right there. And now we’re on frame one. So this is where we would actually start with the camera and we’re ready to go ahead and go out and shoot.
All right! So I’m here at my backyard and before I get started shooting, I want to talk to you guys about the light meter inside this camera because this is what I think makes this camera great for beginners. When I first got started, I was using a Minolta XG-M and the light meter inside of that thing wasn’t very simple especially for a beginner because as I’m metering in here and I’m looking through the viewfinder and I’m adjusting my aperture, there was an LED readout on the inside of the viewfinder and that would basically light up by the shutter speed I needed for the correct exposure. So I would be metering in here and then I would change my aperture and then I would have to come down here and adjust the shutter speed. It was just all this back and forth. Whereas with this camera, it’s really, really simple because you don’t have to worry about what it is you’re shooting at; you can just focus on getting the light meter correct.
And the way this works it has a needle inside the viewfinder with a positive sign and a negative sign on the inside of the finder. So as you’re looking through there and you’re adjusting your settings, this needle will go up or down depending on what kind of light you’re working with. So if your needle is pointed up at the positive, you’re going to be overexposed and if it’s pointing down, you’re going to be underexposed. And what you want to do is make sure you get it right there in the level in the middle and there’s a little gap that kind of lets you know when the meter is within that range you’re going to be around the correct exposure. Learn about metering for film photography.
And to me, I think this is perfect because when people are starting out, they’re not really understanding what all of these aperture numbers are or the shutter speed is. They’re not worried about that; they just want to take photos. And anytime I recommend this camera to people I say just get started and make sure you get that needle in the middle, make sure you’re in focus and don’t worry about the rest of it. You can learn the aperture and the shutter speeds later. Just try and get comfortable getting photos because that’s what you want to do. You want to go out and shoot. You don’t want to understand how aperture works when you’re first getting started because it’s overwhelming. At least it was to me.
So that’s what I always tell people. I say just work with that needle. Get it in the middle. If you’re shooting anything candid or you’re not on a tripod, try to keep your shutter speed at 60 or higher just so that way they’re not shooting at 18 and wondering why they’re getting blurry photos. So yeah, just really simple stuff. It’s really easy to use a light meter and that’s why I always recommend it to people because whenever you’re getting started, all the other stuff is so overwhelming that this makes it really easy. You’re looking through the viewfinder and you’re not seeing all these numbers and lights and everything. So that’s one of my favorite things about this camera, especially for beginners. So I just want to talk to you guys about that. But I’ve got my HP5 loaded up. I’m going to shoot some photos and then we’ll wrap things up.
That’s the review of the Pentax K1000, and as mentioned, it’s a great camera to start with. Even if you’re not starting, it’s an awesome camera to have. Oftentimes, I’ve wanted to pick one of these up just to have it in my collection because it is an enjoyable camera to use, very simple, feels great in the hands in terms of everything. These lenses are great as well and you can find them for ridiculously cheap.